Learn interpreting audio measurements with Cavern
What's in this topic?
In these pages, you can learn how to interpret audio measurements on multiple levels. This page contains what the result curves in Cavern mean and what basic issues can be spotted on them. To learn about the differences between calibration systems or to check where to put acoustic elements, this is the required Integrator knowledge on the corresponding tab. There is enough info here for even building your own audio measurement system, the Engineer tab precisely tells you how these results are calculated with the exact math used in Cavern and many others.
Frequency responses
Before we get to the single most important measurement, we need to talk about what we exactly measure and what we correct. When a measurement is ran, a measurement signal is played, called the excitement signal. This signal travels through the entire system, however it is assembled: through the receiver or sound card, through the amplifiers, through the speakers, through the room, until it reaches the microphone. What we record with the microphone, is called the excitement response, and includes every single change that happens to anything you play on your system, in any of its components, including even the room itself.
While we measure the excitement response, which contains literally how every possible sound moves the air in the room after playing it on the sound system, it's a very complex mathematical concept. We can't fix every single little thing the speaker or the room is causing to the sound, so we need multiple, easily comprehensible figures to work with. These focus on a small part of all the information we measured, but it is the information we need to fix something. These could range from how much time does it take for the sound to reach the microphone to complicated graphs about which walls reflect the sound and how. The most important of all these is the sound's tonality, technically known as the frequency response:
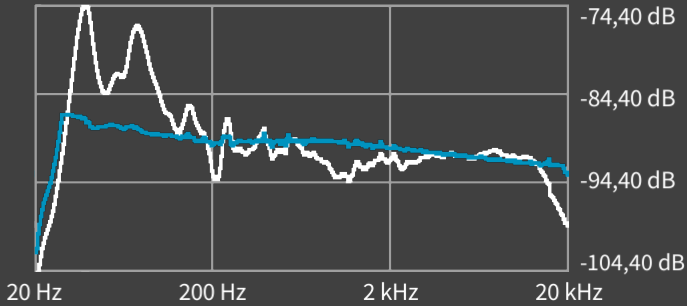
Different versions of Cavern QuickEQ (Home, Complex) show the frequency responses differently. Here, we chose Complex, because it shows each speaker (or channel) separately. This graph shows the sound pressure level (also called gain or commonly volume) at each frequency. The horizontal axis is the frequency, and is split into 3 parts: at the left side of the graph, between 20 and 200 Hz, it's the bass, in the middle between 200 and 2000 (or 2k) Hz are the mids, and the rest, above 2k until 20k, are the highs or treble. One thing to note is that subwoofers in QuickEQ only show bass frequencies on the entire graph, they're basically the left side stretched out. The higher a point is on the curve, the higher the volume of that specific frequency. There are two curves on this graph: white is what Cavern QuickEQ measured, and blue is how it will look like after the calibration is applied. One more thing to note is this graph doesn't show just the volume that comes out the speakers. The measurement also adds all the echoes to it, so a reverberating sound will be shown much louder than it actually sounds like. The main task of an audio calibration system is making these graphs as close to a target as possible. This target is not necessarily a flat line, but something you can change and experiment with.
Target curves
Cavern QuickEQ supports multiple target curves, resulting in different sound profiles or tonalities, depending on what you want. Below are the most common options:
- Room Curve - Most rooms naturally amplify the bass and lower the treble. This curve aims to mimic that sound, resulting in the closest to life sound for most users.
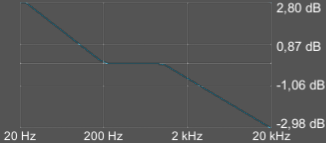
- Flat - No additional EQ is applied, each frequency response is flattened as much as possible.
- Punch - Chest slams are caused by swiftly rising lower bass. This curve forces exactly that, resulting in stronger chest slams, but also in a louder bass.
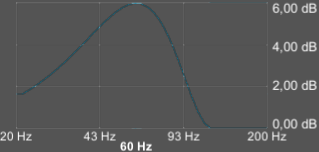
- X-curve - The standard cinema curve for large rooms. Nearly all movies were mixed to this target and all cinemas are configured to this curve. It's optimized for outdoor use by greatly suppressing high frequencies.
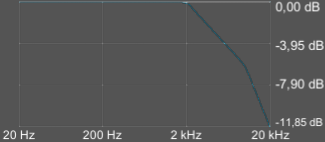
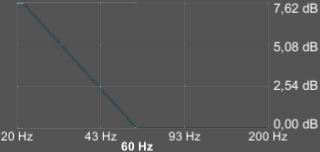
- Depth - Adds a ramp to the subwoofer that keeps increasing the volume down to the end of the human hearing range. This will sound like your subwoofer can show more deep notes than it is actually able to. Bass is greatly amplified.
Spotting issues
While Cavern QuickEQ can fix most acoustic problems easily, there are some issues that are not possible to account for digitally.
Notches
It can happen that there is a frequency which can't be played with the sound system, or it's so faint that no amount of amplification can make it audible. Thus, no calibration system can fix this. These missing frequencies are called nothes, and look like the following:
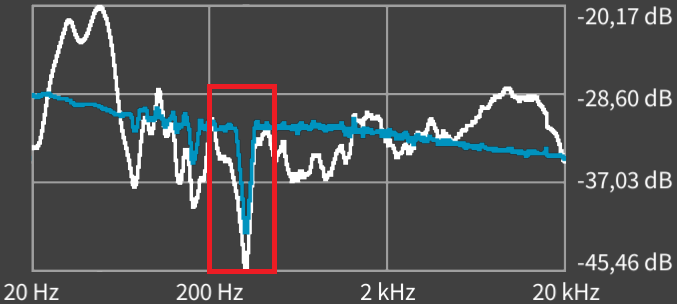
This is different from the left or right side of the graph, where the sound fades to silence. These are the limits of your speaker, and are called cutoff points. We are talking about narrow cuts or notches. Notches can have three root causes: speaker placement, speaker design, or the room itself. When a notch appears, it's best to experiment with moving your speaker. Even a small movement can cause notches to appear or disappear, and small rotations can also change the sound profile completely. Move your speaker, measure again, and check if the notches disappeared. If they did, it's great, but if they didn't, it's time to check if the issue is the speaker or the room. Move the microphone close to the speaker, to about 1 meter distance, and measure again. If the notch disappeared, the issue is caused by the room, and this can only be fixed with acoustic treatment. If the notch didn't disappear, the speaker, more likely its crossover design is responsible for this fault.
This is only an advertisement and keeps Cavern free.
Peaks
If acoustic issues can cause some frequencies to be severely silenced, they can also cause them to be way louder than they should be. These are present as peaks, for example, the following subwoofer has a loud one:
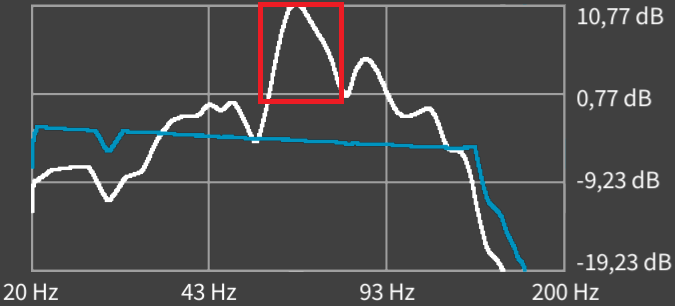
Peaks are normally not a problem for any calibration system, especially for Cavern QuickEQ, which has no limit on how much volume it can remove at a frequency. However, there is another issue associated with peaks: reverb. The most common cause of a peak is your room resonating at that specific frequency, and can result in very boomy bass with sounds that are played on that note. To account for this, Cavern lowers the volume even more for the frequency. This shows flat on the result curve, because the measurement and the result has the echoes added to them. Peaks can be prevented by two ways: moving the speaker or using acoustic treatments. These treatments for subwoofers or bass frequencies generally need large bass traps.
Frequency responses in Cavern QuickEQ for the Home
QuickEQ Home doesn't separate the speakers to different graphs, it aggregates all of them:
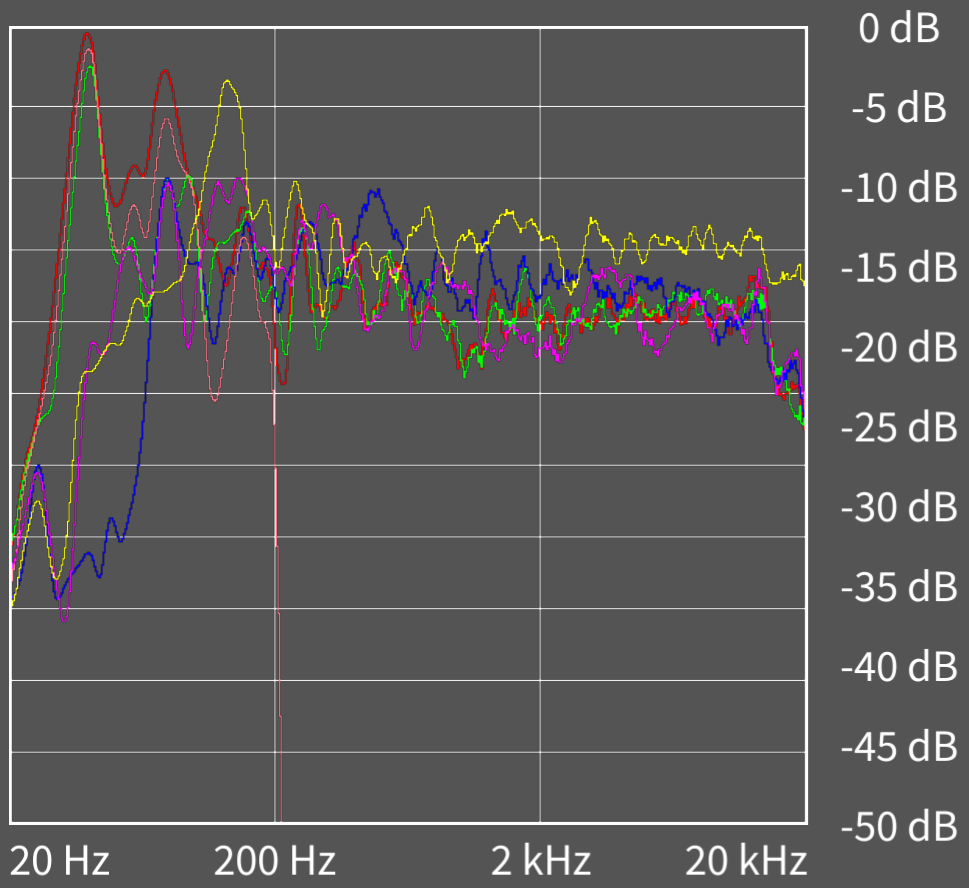
While this graph is not intended for spotting issues, the measurement can be exported from QuickEQ Home (on the export screen) and imported into QuickEQ Complex (on the Export/import tab) for further analysis. These are averaged responses from multiple microphones, and the averaging will likely smooth out notches. The reason for this unlabeled aggregation is that the graph should be used for level alignment, not for acoustic decisions. The software for that is the Complex version of QuickEQ.
Gains, delays, and polarities
Gains or volumes and delays can be set for each speaker or channel. This accounts for some speakers being closer to you than others, otherwise a perfect soundstage would only be possible if speakers were in a bubble around you. When sound travels in air, it's like a sphere that expands. When it gets further, it gets larger, and a smaller part of it reaches your ear: this is why further sounds are fainter. Sound is also a relatively slowly travelling wave, and even in a simple small room, it can result in a speaker's sound reaching your ears way sooner than others. It also takes time for active (powered) speakers to process the sound, which also delays sound from that speaker, mostly subwoofers. These time differences can be accounted for by delaying the sound of speakers whose sound reaches the microphone more quickly than others. This means the closest speaker will likely need a lot of added delay, and the furthest or the subwoofer will likely need no additional delay. Calculating gains is very easy: after the corrections to the frequency response are performed, a calibration system just needs to align all the curves up or down until they are on the same level. This is what the per-channel gain/volume setting does.
While not as important as the frequency responses, these settings also heavily affect the soundstage. A single gain, delay, or polarity can break imaging if set poorly. With Cavern QuickEQ, it's very easy to set them properly: just export to Equalizer APO, and their suggested values will be there, with hundredths of a unit in precision. Being able to control the gains and delays with this precision is crucial and determines the sound quality of different calibration systems, as seen on the export screen of QuickEQ for the Home. These hundredth unit precisions are very important: 0.01 dB can be the difference between vocals of a stereo song coming perfectly centered from them or not, and 0.01 ms can be the difference between speakers being able to fade sounds between them seamlessly ("a bubble of sound") or not.
Polarity only means the + and - terminals of a speaker are properly wired to the + and - terminals of the amplifier. If the polarity is positive, they're wired correctly, but if the polarity is negative, they're wired + to - and - to +. Polarities are very time consuming to determine by hand. A rule of thumb is, if all speakers are wired properly to their + and - terminals, polarities should not be swapped for any speaker, and gains/delays will align them correctly. To check if two channels are correctly "in phase" (their polarities match) after correction, you'd have to measure them together twice: once normally, both playing the same measurement signal, and the other time is the same, but one speaker's + and - wires should be swapped on only one end of it. If their combined volume is louder, the swapped wire should stay. Cavern QuickEQ can simulate this quickly, setting all polarities using the Correct polarities option under Setup/Show advanced features. This will include polarity settings or recommendations in the exported corrections. It's very rare that this correction should be performed, and is not perfectly accurate, this is why it's a hidden setting in QuickEQ Complex and completely absent from QuickEQ Home. Normally speakers are built in a way when they receive positive voltages, their diaphragm moves outside, so all polarities should match by default, but sometimes they're reversed, detecting this is one use case. Very poor acoustics would be another, but it's very rare. The third use case needs to be manually evaluated: if QuickEQ suggets a delay that is so large it can't be entered to the target system. Here, delays should be set as close to the recommendations as possible, then another measurement should be ran with Correct delays disabled, and Correct polarities enabled. Use only the polarity results from the second export, this will close the soundstage gap compared to proper delays.
Crossover points
The last manually configurable audio calibration setting on an average AVR or processor is the crossover point, or the frequency where the sound of speakers are cut in half, then higher frequencies stay, and low frequencies get moved to the subwoofer(s). The naive ways to determine the crossover points are checking the cutoff points of your speakers or going with the default value of 80 Hz. Both ways leave a lot of quality or performance on the table. Neither of them account for the strengths and weaknesses of the involved speakers, and using the cutoffs will leave a lot of bass to the amplifier, driving it to its limits regarding power use as it's not optimized for driving multiple channels with heavy bass.
The bit more time-consuming but correct way is checking the crossovered speaker and the subwoofers for their efficient ranges. First, mark the subwoofer's highest frequency where it's possible to flatten it with EQ. For example, check this subwoofer together:
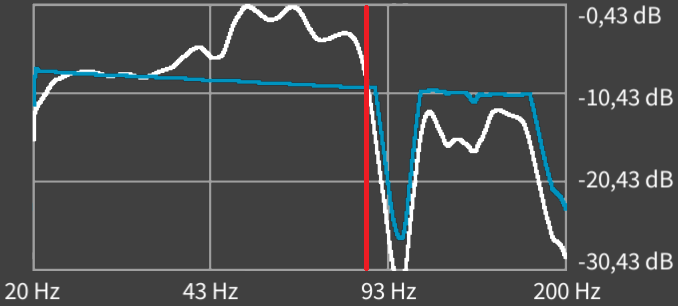
In this case, while the subwoofer is mostly usable above 87 Hz, we don't want to set the crossover above that, as it's neither efficient, nor free of notches. When you hover the mouse over the graph, QuickEQ will display the exact frequency. If the frequency isn't displayed just below the graph, click once in the Cavern window. Let's see the channel we want to cross over to this sub:
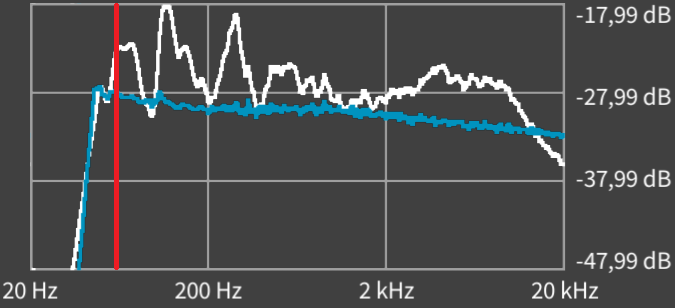
For this main channel (non-subwoofer speaker), the efficient range is marked, at 60 Hz. To the left of it, while the corrected curve is flat for a while, it's already in the speaker's cutoff range, because it falls sharply. We determined that the minimum value for this crossover is 60 Hz, because that's the main channel's lowest stable frequency, and the maximum is 87 Hz, because that's the subwoofer's highest stable frequency. Any value between the two is fine.
Cavern QuickEQ by default automatically determines the crossover frequency, and if no crossover is enabled on the audio system, it will export it to some targets, like Equalizer APO. It calculates 75 Hz for our previous example. Keep in mind that changing the crossover frequency at any time on your AVR or processor (if you use one) will require Cavern QuickEQ to be run again, as it calibrates with the final crossover setting in mind. Because of this, for a perfect calibration, the first measurement should determine the crossover frequencies, and the next measurement should be the final calibration. Only the Complex version of QuickEQ handles crossovers, under the Crossover tab. By pressing the Automatically adjust now button, the sliders will snap to the recommended crossover frequencies.