Cavernize user guide
What is Cavernize?
This software is able to convert 3D surround sound to formats that can be played on your PC. What was only possible with expensive AVRs before, like true Dolby Atmos playback, can be done for free with Cavern. Curious users can have fun with listening to one or few objects at a time with the filtering capabilities of the tool. You can find Cavernize on the Downloads page.
Cavernize is a conversion tool, meaning it will create a new file for your content, with the audio transformed for spatial playback. Provide what channel layout you would like to use, and Cavernize will render the selected content to that specific layout. Layouts like 5.1.2 are possible on any 7.1 system by repositioning a few speakers. In that case, the side outputs become top outputs, and if you wire in-ceiling speakers as sides, you will experience true height surround on that system.
What files are supported?
Supported codecs:
- Meridian Lossless Packing (TrueHD Atmos) through truehdd
- Enhanced AC-3 with Joint Object Coding (Dolby Digital Plus Atmos)
- Audio Definition Model Broadcast Wave Format
- Limitless Audio Format
- RIFF WAVE
Supported file types:
- Matroska (.mka, .mkv, .weba, .webm)
- MP4 variants (.mov, .mp4, .qt)
- Enhanced AC-3 (.ac3, .eac3, .ec3)
- Limitless Audio Format (.laf)
- RIFF WAVE (.wav)
How to convert content?
Firstly, if you don't have Cavernize, download it from here. You will have to unzip the file you just downloaded, which can be done by either
- right clicking and choosing the Extract option, or
- opening the file, then opening CavernizeGUI.exe inside it, and selecting Extract all on the popup.
Cavernize can then be launched from the new folder you just created, by double clicking CavernizeGUI with the C icon.
In Cavernize, you only need three small steps: select your channel layout, select the content you'd like to convert, then click Render.
This is only an advertisement and keeps Cavern free.
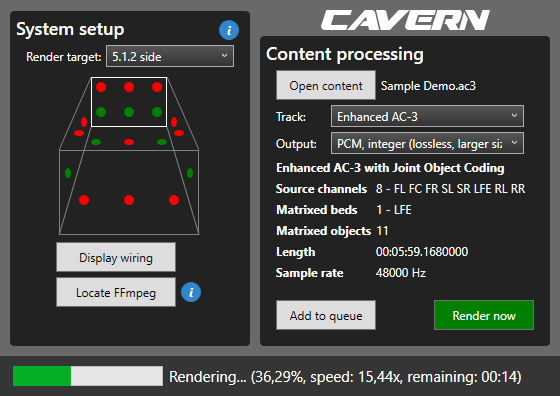
System setup
On the left side panel, set up how many speakers you have and where they are placed. The Render target field lists all available layouts.
The image of the room shows all supported channels, and the speakers that will be used are marked with blue. To see which output of your sound card connects to which speaker, press the Display wiring button. This will show messages like "Connect the Top side left channel to your system's Side left output." for each speaker. When the wiring matches this setting, the rendered content will be true 3D surround sound, but the PC or player will think it's a simple 7.1 file.
Next to the preset layouts, two custom options are available:
- Cavern Driver: Use the layout you set up in the Cavern Driver. This allows you to go beyond the 16 channels present in the presets, or customize the layout exactly to your room, re-rendered to the precise degrees.
- Headphone Virtualizer: Outputs a stereo file that provides ambisonic listening experience through headphones.
For advanced users, the Rendering menu has some toys. Hover the mouse on each option in Cavernize to learn more about them, or open the next block.
Content processing
Cavernize will remember your system setup, so at later launches you only have to work in this small area. Open the file you want to convert for PC playback with the Open button. All important info about the file will appear, along with the final settings that you might not even have to change. The Track field lists all detected audio tracks with their languages, with the highest quality supported object-based track already selected. When you change the track, the file info will update. The Output field selects the final codec. All of these are supported on a PC. Choose your preferred one by the pros and cons listed next to each of them, telling tradeoffs between quality and supporting different protocols. When everything is set, press Render. Name the output file, then wait for the conversion to finish, and enjoy the result!
Locate FFmpeg (optional)
For some conversions, FFmpeg has to be used until Cavern fully supports all formats required for the process. If you're just exporting to MKV with a PCM track, you don't need it, that works completely in Cavernize without any external software's installation. If you have FFmpeg already installed, Cavernize will auto-detect it. If you see "Ready!" at the bottom of the window, Cavernize have found FFmpeg.
However, if you use targets that require FFmpeg, download it from its website.
After unpacking it anywhere, press the Locate FFmpeg button, and find where ffmpeg.exe is.
It's usually in the bin folder of the downloaded archive.
You will have to unpack it first.